最近、2020年6月30日に日本の大規模なmastodonインスタンス mstdn.jp と mastodon.cloud が閉鎖される事が発表されました。
そこで今回はOracle Cloud Free TierのOracle Cloud Infrastructure Compute VMを使って無料でmastodonインスタンスを建ててみようと思います。GCEのf1-micro一つでも快適さ度外視すれば動くらしいので、お一人様インスタンスでしたらこのOracleのVM使えばなんとか動くのではないでしょうか。知りませんけど
必ず公式のガイドMastodon - Installing from sourceを確認しながら作業を行なってください。
追記:
2021年6月頃に「VM.Standard.A1.Flex」が4vCPU, RAM24GBまで無料になりました。
このシェイプを使うとチューニング無しで非常に人権のあるお一人様インスタンスを作れるので、おすすめです。
それではまず、OracleでFree VMをたてちゃいましょう。
(実は2つまで無料なので、DB鯖と分けたほうがいいと思いますが、今回は一つにします。)
今回はUbuntu 20.04を使っていきます。
またメール系にmailgunをMailgunを使っています。
SendGrid等を使う方は別途設定をしてください。
おおよそInstalling fom sourceに沿って構築していきます。(多分)
以下のようにインスタンスのシェイプがVM.Standard.E2.1.Microになっており、また名前の横にAlways Freeが表示されているか確認しましょう。

(画像だとDB鯖と分けてる感じですけど、今回の記事とは関係が無いので気にしないでください。)
独自ドメインは各自で用意をお願いします。私はとりあえずFreenomで無料ドメインを取りました。
また、今回はCloudflareを使ってます。楽なので。

Contents
Mastodon
この記事を書いたときのmastodonの最新バージョンはv3.5.3です。
今後のアップデートで以下の方法で導入できなくなる可能性もあるので注意してください。
アップデート & 必要なソフトウェアのインストール
# Oracle Cloud Agentがデフォで入っていますが、地味にメモリを食うので初めに削除しておくことをおすすめします。
$ sudo snap remove oracle-cloud-agent

# アップデート&アップグレード
$ sudo apt-get update; sudo apt-get upgrade -y; sudo dist-upgrade -y; sudo apt-get autoremove -y;

# Swapファイルの作成(2GB)
$ sudo dd if=/dev/zero of=/swap bs=256M count=8
$ sudo chmod 0600 /swap
$ sudo mkswap /swap
$ sudo swapon /swap
$ sudo vim /etc/fstab
#以下をfstabの一番下に入力して保存
/swap swap swap defaults 0 0

# Nodejsのインストール
$ curl -sL https://deb.nodesource.com/setup_16.x | sudo bash -
# yarnのインストール
$ curl -sS https://dl.yarnpkg.com/debian/pubkey.gpg | sudo apt-key add -
$ sudo apt-get update
$ sudo apt-get install nodejs -y
$ echo "deb https://dl.yarnpkg.com/debian/ stable main" | sudo tee /etc/apt/sources.list.d/yarn.list

# その他必要なものをインストール
$ sudo apt-get update
$ sudo apt-get install git vim curl wget build-essential -y
$ sudo apt-get install ffmpeg libpq-dev libxml2-dev libxslt1-dev file git-core \
  g++ libprotobuf-dev protobuf-compiler pkg-config nodejs gcc autoconf \
  bison build-essential libssl-dev libyaml-dev libreadline6-dev postgresql \
  zlib1g-dev libncurses5-dev libffi-dev libgdbm-dev \
  nginx certbot  yarn libidn11-dev libicu-dev libjemalloc-dev \
  postgresql redis-server -y;
$ sudo systemctl enable nginx;
ImageMagickのビルド
ImageMagickを標準で入れると画像の変換が重いので、処理を軽くするためにビルドし直します。
必要の無い方は
$ sudo apt-get install imagemagickでインストールして次のステップへ飛んでください。
$ sudo apt-get build-dep imagemagick -y;
# build-depでエラーが出る際はvimで/apt/source.listを開いて
# :%s/# deb-src/deb-src/g
# 保存して抜けたらapt-get update

$ cd /usr/local/src
$ sudo wget https://www.imagemagick.org/download/ImageMagick.tar.gz
$ sudo tar -xvf ImageMagick.tar.gz
$ cd ImageMagick-
$ sudo ./configure  --with-quantum-depth=8 --disable-hdri --with-jemalloc
$ sudo make && sudo make install
$ sudo ldconfig /usr/local/lib
$ sudo convert -version
Version: ImageMagick 7.0.10-14 Q8 x86_64 2020-05-29 https://imagemagick.org
Copyright: © 1999-2020 ImageMagick Studio LLC
License: https://imagemagick.org/script/license.php
Features: Cipher DPC OpenMP(4.5)
Delegates (built-in): bzlib djvu fftw fontconfig freetype jbig jng jpeg lcms lqr lzma openexr pangocairo png tiff webp wmf x xml zlib
OracleのIngress設定とiptablesの設定
ブラウザからサーバーにアクセスを可能するために80, 443ポートを開く必要があります。
後々開けておかないと詰まるので先に開けておきましょう。
まずはOracleのネットワーク設定ページでイングレスルールでこれらのポートを開くように設定してください。
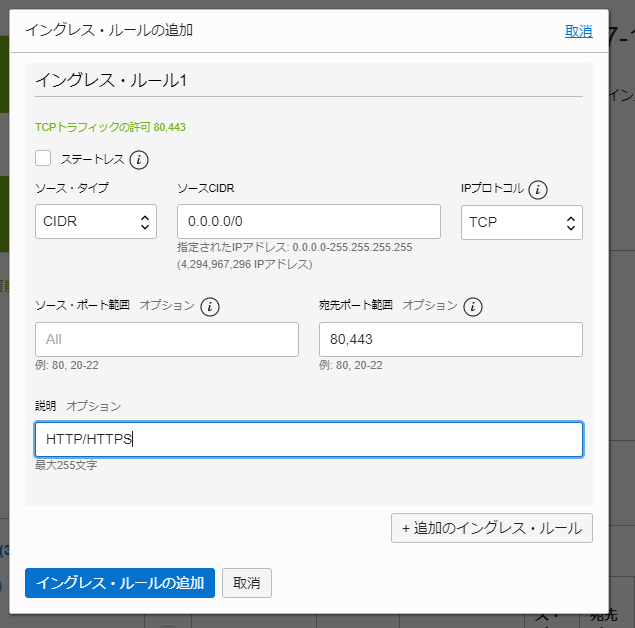
次にiptablesの方も80, 443を開けておきます。
$ sudo apt-get install iptables-persistent -y
$ vim /etc/iptables/rule.v4

# -A INPUT -p tcp -m state --state NEW -m tcp --dport 22 -j ACCEPTの前後ぐらいに以下を追加
-A INPUT -p tcp --dport 80 -j ACCEPT
-A INPUT -p tcp --dport 443 -j ACCEPT

$ sudo systemctl restart netfilter-persistent
Mastodonの導入
公式に沿っていきます。
$ sudo adduser --disabled-login mastodon
$ sudo su - mastodon
$ git clone https://github.com/rbenv/rbenv.git ~/.rbenv
$ cd ~/.rbenv && src/configure && make -C src
$ echo 'export PATH="$HOME/.rbenv/bin:$PATH"' >> ~/.bashrc
$ echo 'eval "$(rbenv init -)"' >> ~/.bashrc
$ exec bash
$ git clone https://github.com/rbenv/ruby-build.git ~/.rbenv/plugins/ruby-build

# Rubyのインストール
$ RUBY_CONFIGURE_OPTS=--with-jemalloc rbenv install 3.0.3
$ rbenv global 3.0.3
$ gem install bundler --no-document

$ exit
PostgreSQLの設定
ではPostgreSQLの軽いチューニングをしておきます。
PGTuneで各自の環境に合わせてPostgreSQLのチューン用設定を出力させ、それをpostgresql.confにコピペします。以下は一例です。
$ sudo vim /etc/postgresql/12/main/postgresql.conf

# ----------------------------------
# DB Version: 12
# OS Type: linux
# DB Type: web
# Total Memory (RAM): 1 GB
# CPUs num: 2
# Data Storage: san

max_connections = 200
shared_buffers = 256MB
effective_cache_size = 768MB
maintenance_work_mem = 64MB
checkpoint_completion_target = 0.7
wal_buffers = 7864kB
default_statistics_target = 100
random_page_cost = 1.1
effective_io_concurrency = 300
work_mem = 1310kB
min_wal_size = 1GB
max_wal_size = 4GB
max_worker_processes = 2
max_parallel_workers_per_gather = 1
max_parallel_workers = 2
max_parallel_maintenance_workers = 1
# ----------------------------------

$ sudo systemctl restart postgresql
PostgreSQLにmastodonユーザーを作ります。
$ sudo -u postgres psql
postgres=# CREATE USER mastodon CREATEDB;
postgres=# \q
Mastodonの設定
ではMastodonの導入をしていきます。
$ sudo su - mastodon
$ git clone https://github.com/tootsuite/mastodon.git live && cd live

# 最新のバージョンをチェックアウト
$ git checkout $(git tag -l | grep -v 'rc[0-9]*$' | sort -V | tail -n 1)

# dependenciesのインストール
$ bundle config deployment 'true'
$ bundle config without 'development test'
$ bundle install -j$(getconf _NPROCESSORS_ONLN)
$ yarn install --pure-lockfile

# 後はmastodonの初期設定です。ガイドに従って各々設定していってください。
$ RAILS_ENV=production bundle exec rake mastodon:setup
後にpgbouncerを導入する際にposgresqlのmastodonユーザーのパスワードが必要になるので、必要に応じて設定し、控えておいてください。
ちなみに今回はObject Storageを用いませんが、必要な場合にはsetup中に設定しておきましょう。(後からでも追加設定は可能です。)
レイテンシを気にしないのであれば75GB(アウトバウンド75GB/mo.とストレージ容量合計75GB)まで無料で使えるScalewayのをおすすめします。
Nginxの設定
Nginxの設定です。設定ファイルはmastodonが用意してくれているのでこれを使っていきます。
また同時にcertbotでssl証明証も発行しておきます。
$ sudo cp /home/mastodon/live/dist/nginx.conf /etc/nginx/conf.d/mastodon.conf

# mastodon.confを若干書き換えます。
# 1. example.comを自分のドメインに変更
# 2. ssl_certificateとssl_certificate_keyの部分をアンコメント
$ sudo vim /etc/nginx/conf.d/mastodon.conf

:%s/examle.com/your-domain.com/g

ssl_certificate     /etc/letsencrypt/live/your-domain.com/fullchain.pem;
ssl_certificate_key /etc/letsencrypt/live/your-domain.com/privkey.pem;
# --------------------------------------------------------------
# 保存&終了後
# Let's Encryptで証明証を発行。
$ sudo systemctl stop nginx
$ sudo certbot certonly --standalone --rsa-key-size 4096 -d your-domain.com

# 証明証の発行が成功したらnginxを起動
$ sudo systemctl start nginx
mastodonのデーモン登録
mastodonをデーモンで起動するように設定します。
このデーモンの設定ファイルも用意してくれているのでそれをコピーして使います。
$ sudo cp /home/mastodon/live/dist/mastodon-*.service /etc/systemd/system/
$ sudo systemctl enable mastodon-web
$ sudo systemctl enable mastodon-sidekiq
$ sudo systemctl enable mastodon-streaming
$ sudo systemctl start mastodon-{web,sidekiq,streaming}
Cronの設定
定期的にリモートサーバーのメディアを削除しないとローカルストレージが圧迫され続けます。
それを防ぐためにcronでメディアを定期削除するようにしておきましょう。
--days=の部分で何日より前のメディアを削除するか設定できます。
$ sudo su - mastodon
$ crontab -e

# 3日より前のリモートメディアを削除
00 3 * * * cd /home/mastodon/live && RAILS_ENV=production /home/mastodon/.rbenv/shims/bundle exec bin/tootctl media remove --days=3
# 10日より前のpreview cardを削除
00 5 * * * cd /home/mastodon/live && RAILS_ENV=production /home/mastodon/.rbenv/shims/bundle exec bin/tootctl preview_cards remove --days=10

$ exit
Let's encryptの更新もcronに入れておきましょう。
$ sudo crontab -e

@weekly certbot renew
ここまで終わると設定した独自ドメインにアクセスすればmastodonのページが表示されるはずです。
お疲れさまでした。
若干のmastodonのチューニング
正直、チューニング無しではサーバーのスペック的に厳しいので軽くなるようにしておくとベターです。
とりあえずmastodonをstopしましょう。
$ sudo systemctl stop mastodon-*mastodon-*.serviceの設定
$ sudo vim /etc/systemd/system/mastodon-web.sevice
#とりあえず以下を上書きコピペでいいかと思います。
[Unit]
Description=mastodon-web
After=network.target

[Service]
Type=simple
User=mastodon
WorkingDirectory=/home/mastodon/live
Environment="RAILS_ENV=production"
Environment="PORT=3000"
Environment="WEB_CONCURRENCY=1"
Environment="MAX_THREADS=5"
ExecStart=/home/mastodon/.rbenv/shims/bundle exec puma -C config/puma.rb
ExecReload=/bin/kill -SIGUSR1 $MAINPID
TimeoutSec=15
Restart=always

[Install]
WantedBy=multi-user.target

# --------------------------------------------------------------
$ sudo vim /etc/systemd/system/mastodon-sidekiq.sevice
#とりあえず以下を上書きコピペでいいかと思います。
[Unit]
Description=mastodon-sidekiq
After=network.target

[Service]
Type=simple
User=mastodon
WorkingDirectory=/home/mastodon/live
Environment="RAILS_ENV=production"
Environment="DB_POOL=15"
Environment="MALLOC_ARENA_MAX=2"
ExecStart=/home/mastodon/.rbenv/shims/bundle exec sidekiq -c 15
TimeoutSec=15
Restart=always

[Install]
WantedBy=multi-user.target

$ sudo systemctl daemon-reload
$ sudo systemctl start mastodon-*
Redis
標準でmastodonはTCPでRedisと通信するのでUnix Socketを使うようにしておきます。こっちの方がいいらしいです。
$ sudo vim /etc/redis/redis.conf

port 0
unixsocket /var/run/redis/redis-server.sock
unixsocketperm 770

# --------------------------------------------------------------

$ sudo usermod -aG redis mastodon
$ sudo systemctl restart redis-server

# .env.productionの中身を変更します。
$ sudo su - mastodon
$ vim live/.env.production

#以下をコメントアウト
---
#REDIS_HOST=localhost
#REDIS_PORT=6379
#REDIS_PASSWORD=
---
#以下を追加
REDIS_URL=unix:///var/run/redis/redis-server.sock

$ exit
$ sudo systemctl restart mastodon-{web,sidekiq,streaming}
PGBouncerの導入
いい感じにpostgresqlのコネクションをプールしてくれるやつです。負荷が減ります。
これを導入すると、将来mastodonをアップデートした際のdb:migrateがそのままできなくなるので
$ RAILS_ENV=production DB_PORT=5432 bundle exec rails db:migrateのようにDB_PORT=5432を忘れずにつけるようにしてください。(なくても大丈夫っぽい??)
$ sudo apt-get install pgbouncer -y

#もしmastodonのsetupの際にmastodonユーザーのパスワードを設定していない場合は以下のコマンドで設定してください。
$ sudo -u mastodon psql mastodon_production -w
mastodon_production=> ALTER USER "mastodon" WITH PASSWORD 'new_password';
mastodon_production=> \q

# --------------------------------------------------------------
# PGBouncerの管理ユーザーの作成
$ sudo -u postgres psql
postgres=# CREATE USER pgbouncer WITH SUPERUSER PASSWORD 'pgbouncer_password';
postgres=# \q

# --------------------------------------------------------------

# userlist.txtの編集
# -- その前に以下のコマンドで出力された文字列を控えてください
# -- new_passwordとpgbouncer_passwordの部分は先程控えたpostgresqlのユーザーのパスワードを入れてください。パスワードとそれに対応するユーザー名の間には空白を入れません。
$ echo -n 'new_passwordmastodon' | md5sum
70797e886fb55392d23866ae1ddeca19  -
$ echo -n 'pgbouncer_passwordpgbouncer' | md5sum
e879b55b3866f67816b44c8aabf9e662  -

# ではuserlist.txtの編集をしていきましょう
$ sudo vim /etc/pgbouncer/userlist.txt

# 以下のように入力して保存。出力されたハッシュの先頭にmd5を忘れずに入れましょう。
"pgbouncer" "md5e879b55b3866f67816b44c8aabf9e662"
"mastodon" "md570797e886fb55392d23866ae1ddeca19"

# 次にpgboucer.iniの設定です。
$ sudo vim /etc/pgbouncer/pgbouncer.ini
#[database]の真下に以下を
mastodon_production = host=/var/run/postgresql port=5432 dbname=mastodon_production user=mastodon password=new_password

# auth_type = trustを以下に
auth_type = md5
# admin_usersをコメントアウトして以下に
admin_users = pgbouncer
# pool_mode = をコメントアウトして以下に
pool_mode = transaction

# --------------------------------------------------------------

# 編集が終わったら、次はpostgresqlの認証の設定をしていきます。
$ sudo vim /etc/postgresql/12/main/pg_hba.conf

# DO NOT DISABLE!
# If you change this first entry you will need to make sure that the
# database superuser can access the database using some other method.
# Noninteractive access to all databases is required during automatic
# maintenance (custom daily cronjobs, replication, and similar tasks).
#
# Database administrative login by Unix domain socket
local   all             postgres                                peer
#以下の2つを追加
local   all             pgbouncer                               md5
local   all             mastodon                                md5

$ sudo systemctl restart postgresql
$ sudo systemctl restart pgbouncer
PGBouncerからPostgreSQLに接続できるかの確認してみましょう。
$ sudo -u mastodon psql -p 6432 -U mastodon mastodon_productionパスワードの入力を求められて、入力後データーベースにアクセスできればOKです。
それでは最後に.env.productionを編集して、mastodonがpgbouncerを挟んでpostgresqlに接続するようにします。
$ sudo su - mastodon
$ vim live/.env.production

#以下の部分を編集します。
#DB_HOST=/var/run/postgresql
#DB_PORT=5432
#DB_PASS='db_password'
DB_HOST=localhost
DB_PORT=6432
DB_PASS='db_password'

#もしPREPARED_STATEMENTS=trueが.env.production内に記載されていた場合は以下のように変更します。
PREPARED_STATEMENTS=false

#編集が終わり保存したら、mastodonを(再)起動します。
$ exit
$ sudo systemctl stop mastodon-web
$ sudo systemctl stop mastodon-sidekiq
$ sudo systemctl stop mastodon-streaming
$ sudo systemctl start mastodon-web
$ sudo systemctl start mastodon-sidekiq
$ sudo systemctl start mastodon-streaming
無事にmastodonアクセスできましたか?
できない場合はログを見て修正していってください。