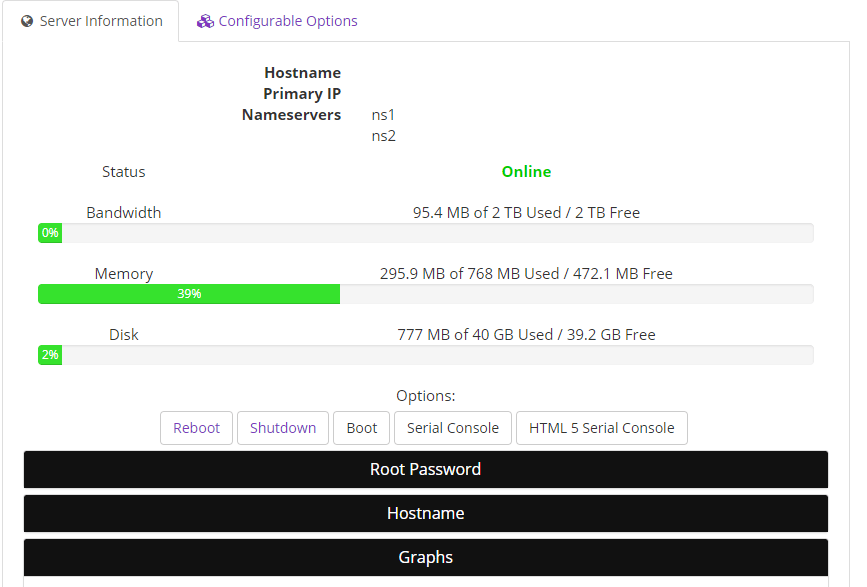
ViPER4Android をAndroid7にインストール

インストールに際して、Busyboxの導入が必須となります。
shellからでも設置は可能ですが、root explorer等のアプリがあると大抵の人は楽かなと思います。

簡単な意訳
ここからzipファイルを落としてきてね。
そのファイルを解凍したら中に、
ViPER4Android_FX_v2505_A4.x-A7.x.apk
ViPER4Android_FX_v2505_A7.x_Nougat_IO_test_fix.apk
の2つが入っているけど今回使うのはViPER4Android_FX_v2505_A7.x_Nougat_IO_test_fix.apkだよ。
そのファイルを設置する前には/vendor/etc/audio_effects.confのバックアップを取っといた方がいいよ。削除してもいいけどもし必要になったらあれだからね。
バックアップができたら、ViPER4Android_FX_v2505_A7.x_Nougat_IO_test_fix.apkを/system/priv-appにコピーしてね。
そしてパーミッションを-rw-r–r–(644)に設定してね。
再起動してViPER4Androidを起動してドライバをインストールしてね。

https://www.droidorigin.com/install-viper4android-on-nougat/
Now that you have everything setup correctly, download the official ViPER4Android for Nougat (FX 2.5.0.5): Link
Extract the downloaded zip and it will contain two apks –
ViPER4Android_FX_v2505_A4.x-A7.x.apk
ViPER4Android_FX_v2505_A7.x_Nougat_IO_test_fix.apk
Since we are going to install V4A on Nougat, we will just need the “ViPER4Android_FX_v2505_A7.x_Nougat_IO_test_fix.apk” file.
If you have downloaded it to your PC instead, just transfer the apk to your phone’s storage.
Before we head to the installation, open the root file explorer and grant it root permissions when prompted. Navigate the root/system storage and go to “/vendor/etc”.
You shall see a file named “audio_effects.conf”. Rename that file to “audio_effects.conf.bak“. While you can simply delete the file, but we prefer renaming and keeping it, if we require it in future.
Open root file manage and browse to the location where the apk is present. Copy the . “ViPER4Android_FX_v2505_A7.x_Nougat_IO_test_fix.apk” file and move it to /system/priv-app.
We are not done yet. Long-press the file, tap on the 3-dot overflow button, and select Properties. Go to the ATTRIBUTES tab, set its permission to -rw-r–r–, and select APPLY.
Reboot your device now.
Now go to the app drawer and run the ViPER4Android FX app. When you are asked for storage permissions, make sure to grant them.
A prompt will display for driver installation. Select Yes to confirm the driver installation process. You will also need to allow Superuser permissions to the app.
Your phone’s screen may freeze, don’t worry just wait and do not exit the app. When the installation is successful, you will get a message. Tap OK and reboot your device.

[template id=”342″]

build.prop bk

https://pastebin.com/ur9yrvts

https://pastebin.com/ur9yrvts

#
# Additional Properties
#
net.tcp.buffersize.default=6144,87380,110208,6144,16384,110208
net.tcp.buffersize.edge=6144,26280,35040,6144,16384,35040
net.tcp.buffersize.evdo_b=6144,262144,1048576,6144,262144,1048576
net.tcp.buffersize.gprs=6144,8760,11680,6144,8760,11680
net.tcp.buffersize.hsdpa=6144,262144,1048576,6144,262144,1048576
net.tcp.buffersize.hspa=6144,87380,262144,6144,16384,262144
net.tcp.buffersize.lte=262144,524288,3145728,262144,524288,3145728
net.tcp.buffersize.umts=6144,87380,110208,6144,16384,110208
net.tcp.buffersize.wifi=262144,524288,1048576,262144,524288,1048576
ro.camera.sound.forced=0
ro.kernel.android.checkjni=0
ro.media.enc.jpeg.quality=100
ro.telephony.call_ring.delay=800
ro.ril.enable.amr.wideband=1
persist.sys.purgeable_assets=1
persist.adb.notify=0
debug.performance.tuning=1
video.accelerate.hw=1
windowsmgr.max_events_per_sec=150

GCP GCE f1-micro cpuバースト機能

f1-microにて。

常時101%ぐらいのCPU使用率で15分に一回1分108-110%ぐらいのCPU使用率になりました。
大体15分に一分程度110%ぐらいまでCPUがバーストされるような感じなのでしょうか。
(常時100%に張り付いてなく本当に瞬間的な場合は150%以上になることもあります。)


もちろん、バースト機能が無い普通のインスタンスでは綺麗な一直線の線です。

ところで、f1-microが無料枠になりましたね。

Google Compute Engine

Scalable, high-performance virtual machines

・1 f1-micro instance per month (US regions only)
・30 GB-months HDD, 5 GB-months snapshot
・1 GB network egress from North America to all region destinations per month (excluding China and Australia)

Always Free Usage Limits – Google Cloud Platform Free Tier

短期間の実験のVPSや軽い趣味用のVPSに無料で使えるサービスというのはなかなか無いのでありがたい限りです。
性能は糞ですが。
AWSがどう出るか…


タダだからといって使いすぎには注意…

Serversman@VPS Debian Jessieにアップグレードしたよ

[Serversman@VPS] Debian 7から8へアップグレードする
アップグレード方法書きました。

ワンコイン500円から使えるお手軽なServersman@VPS
値段は魅力的なのですが、使用できるDebianのバージョンの最高はWheezyまでです。
半年ぐらいDebian Wheezyで頑張ってきたのですがそろそろアップグレードすることにしました。
アップグレードする際には、
systemdに移行しないように
しなければなりません。
移行してしまうと初期化が必要になってきます。