Prime Strategyさんの超高速WordPressのKUSANAGIに数日前のアップデートで簡単にVuls(VULnerability Scanner)が導入できるようになりました。
アップデートの抜粋です。
KUSANAGI8.4.0以降、下記の機能が利用できます。
WAF
TLS1.1以下の廃止
Vuls (脆弱性スキャン)
Open Source Tripwire (IDS)
Suricata (IDS IPS)
https://kusanagi.tokyo/archives/4899/
Contents
Vulsのインストール
sudo kusanagi addon install vulsこのコマンドで一発で導入できます。
以下すべてrootユーザーです。
goやらgo-cve-dictionaryやらgoval-dictionaryも自動的にインストールしてくれて、初回はNVDデータもダウンロードしてくれます。
/rootにcve.sqlite3やconfig.tomlが作成されるのですが、あまり/rootにファイルを置きたくない人は適当にフォルダを作ってその2つを放り込みましょう。
mkdir vuls
mv config.toml vuls/
mv cve.sqlite3 vuls/
Vulsでスキャン
スキャンの前に
一応NVDとJVNのデータの更新とovalデータのダウンロード、gostデータのダウンロードをしておきましょう。
gostはkusanagiでのvulsの導入の際に一緒にインストールされないので手動で入れます。
go get -u github.com/knqyf263/gost
cd $GOPATH/src/github.com/knqyf263/gost
make install
cd /root/vuls
gost fetch redhat
goval-dictionary fetch-redhat 5 6 7
go-cve-dictionary fetchnvd -latest
go-cve-dictionary fetchjvn -latest
あとはスキャンです。
fast scan
デフォルトではfast scanモードのはずです。
速度が速いですが、精度に欠けがあります。
vuls scan -config=/root/vuls/config.toml -results-dir=/root/vuls/results
[Sep  9 16:29:57]  INFO [localhost] Start scanning
[Sep  9 16:29:57]  INFO [localhost] config: /root/vuls/config.toml
[Sep  9 16:29:57]  INFO [localhost] Validating config...
[Sep  9 16:29:57]  INFO [localhost] Detecting Server/Container OS...
[Sep  9 16:29:57]  INFO [localhost] Detecting OS of servers...
[Sep  9 16:29:57]  INFO [localhost] (1/1) Detected: localhost: centos 7.5.1804
[Sep  9 16:29:57]  INFO [localhost] Detecting OS of containers...
[Sep  9 16:29:57]  INFO [localhost] Checking Scan Modes...
[Sep  9 16:29:57]  INFO [localhost] Detecting Platforms...
[Sep  9 16:29:57]  INFO [localhost] (1/1) localhost is running on other
[Sep  9 16:29:57]  INFO [localhost] Scanning vulnerabilities...
[Sep  9 16:29:57]  INFO [localhost] Scanning vulnerable OS packages...
[Sep  9 16:29:57]  INFO [localhost] Scanning in fast mode


One Line Summary
================
localhost   centos7.5.1804  647 installed, 5 updatable


To view the detail, vuls tui is useful.
To send a report, run vuls report -h.
deep scan
スキャン速度は遅いですが、精度がfast scanより上がります。
CentOS7ではyum-plugin-changelog, yum-plugin-psが必要になります。
依存はhttps://vuls.io/docs/en/usage-configtest.html#deep-scan-modeを参照してください。
-deep, --deepの引数でdeep scanができるようですが、私が試した環境ではできなかったのでconfig.tomlにdeep scanの設定を書き込みました。
scanMode = ["deep"]をserverを指定するところに書いておけばいいです。
vim config.toml
[servers.localhost]
host = "127.0.0.1"
port = "local"
scanMode = ["deep"]
fast scanとdeep scanのconfig.tomlを別けておけば楽かもしれません。
vuls scan -config=/root/vuls/config.toml -results-dir=/root/vuls/results
[Sep  9 16:37:30]  INFO [localhost] Start scanning
[Sep  9 16:37:30]  INFO [localhost] config: /root/vuls/config.toml
[Sep  9 16:37:30]  INFO [localhost] Validating config...
[Sep  9 16:37:30]  INFO [localhost] Detecting Server/Container OS...
[Sep  9 16:37:30]  INFO [localhost] Detecting OS of servers...
[Sep  9 16:37:30]  INFO [localhost] (1/1) Detected: localhost: centos 7.5.1804
[Sep  9 16:37:30]  INFO [localhost] Detecting OS of containers...
[Sep  9 16:37:30]  INFO [localhost] Checking Scan Modes...
[Sep  9 16:37:30]  INFO [localhost] Detecting Platforms...
[Sep  9 16:37:30]  INFO [localhost] (1/1) localhost is running on other
[Sep  9 16:37:30]  INFO [localhost] Scanning vulnerabilities...
[Sep  9 16:37:30]  INFO [localhost] Scanning vulnerable OS packages...
[Sep  9 16:37:30]  INFO [localhost] Scanning in deep mode
[Sep  9 16:37:34]  INFO [localhost] (1/647) Fetched Changelogs libzstd
[Sep  9 16:37:35]  INFO [localhost] (2/647) Fetched Changelogs dhcp-common
[Sep  9 16:37:37]  INFO [localhost] (3/647) Fetched Changelogs perl-Exporter
スキャン結果
結果は
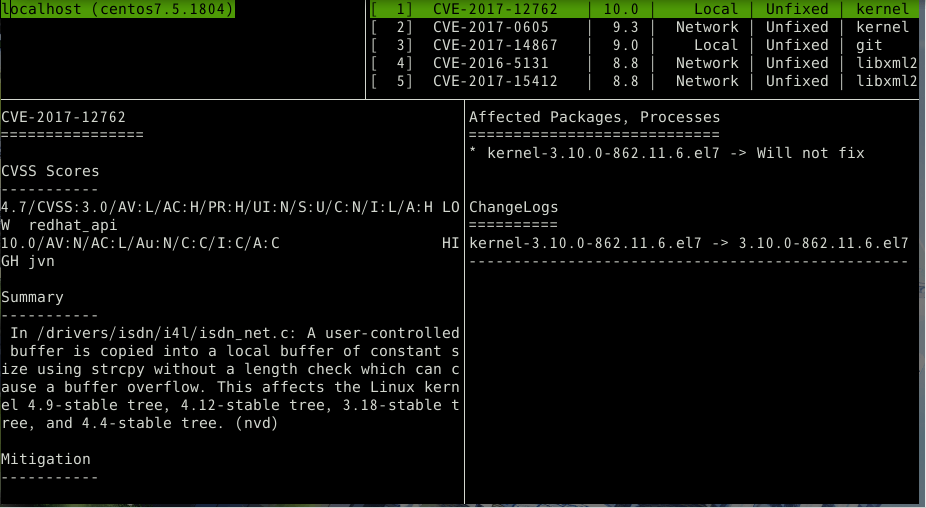
vuls tuiで見ることができます。
またreportでslackなどに結果を送ることができます。
レポートの送信などは色々記事を書いている人がいるので割愛します。